はじめに
Sorceryを使ったTwitterログイン認証の設定です。
基本的にはwikiの通りにすればいいのですが、変なハマり方をしたので、次回の自分への自戒を込めて記録しておきます。
また、コールバックURLなどについて公式ドキュメントを漁ることになったので、日本語でまとめておくことにします。
動作環境
ruby 2.5.3
Rails 5.2.4.2
sorcery 0.14.0
前提
- Sorceryによるログイン機能
- Twitter Develpersのユーザー登録とアプリの登録
簡単な流れ
Sorceryのwikiにチュートリアルがあるので、基本的にはそれに従っていきます。
authenticationsテーブルを作成
1
2
3
4
|
$ rails g sorcery:install external --only-submodules
        gsub  config/initializers/sorcery.rb
      insert  app/models/user.rb
      create  db/migrate/20200203110653_sorcery_external.rb
|
コマンドを打つと、外部認証に必要なauthenticationsテーブルを作成するためのマイグレーションファイルが作られます。
 1
 2
 3
 4
 5
 6
 7
 8
 9
10
11
12
13
|
class SorceryExternal < ActiveRecord::Migration
  def change
    create_table :authentications do |t|
      t.integer :user_id, :null => false
      t.string :provider, :uid, :null => false

      t.timestamps
    end

    add_index :authentications, [:provider, :uid]
    add_index :authentications, :user_id # user_idにindexを貼る場合は追加
  end
end
|
1
|
$ bundle exec rails db:migrate
|
Authenticationモデルの設定
1
|
$ rails g model Authentication --migration=false
|
先ほど既にマイグレーションファイルは作成しているので、--migration=falseオプションを付けています。
1
2
3
|
class Authentication < ActiveRecord::Base
  belongs_to :user
end
|
1
2
3
4
5
|
class User < ApplicationRecord
  authenticates_with_sorcery!
  has_many :authentications, dependent: :destroy
  accepts_nested_attributes_for :authentications # has_many :authenticationsより下に書く
end
|
ここまでは外部認証共通の処理となります。
sorcery.rbの設定
1
2
3
4
5
6
7
|
  config.twitter.key = Rails.application.credentials.dig(:twitter, :key)
  config.twitter.secret = Rails.application.credentials.dig(:twitter, :secret_key)
  config.twitter.callback_url = 'http://localhost:3000/oauth/callback?provider=twitter'
  config.twitter.user_info_mapping = {
    name: 'name',
    description: 'description'
  } # Userモデルの属性名: 'twitterのパラメータ'
|
config.twitter.callback_urlは環境によって変わるはずなので、Configなどを利用してください。
1
2
3
|
twitter:
  key: API keyの値
  secret_key: API secret keyの値
|
 Twitterのscreen_name(`@username`というやつ)は変わる可能性があるので、Authenticationのuid(Twitterアカウント一意のID)を利用したほうがいいです。
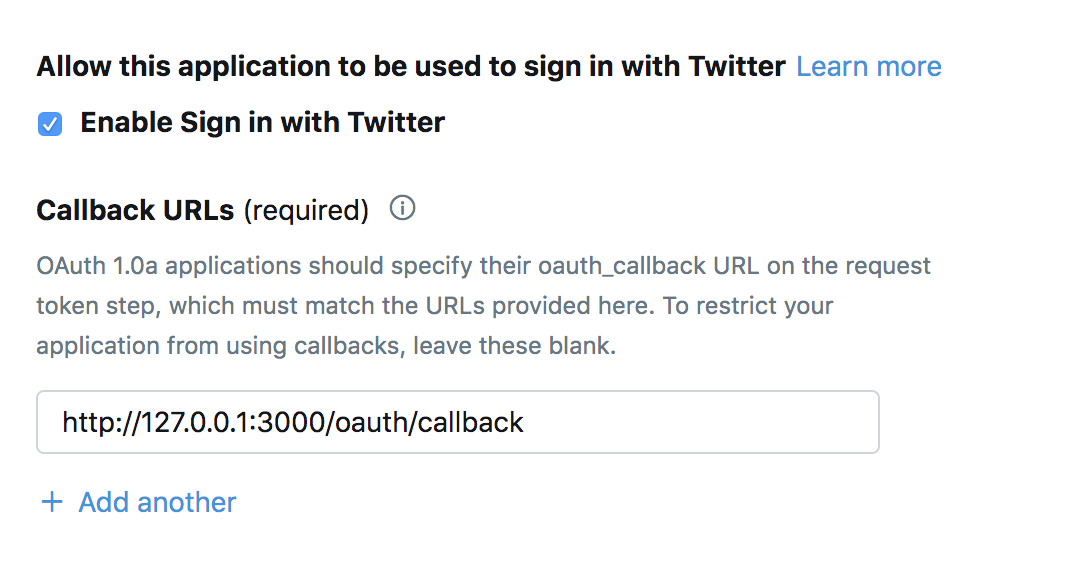
「Enable Sign in with Twitter」にチェックを入れます。
Callback URLsは以下のベストプラクティス(クエリを含まないこと・ローカルホストにしないこと)に則り、http://127.0.0.1:3000/oauth/callbackにします。
(http://lvh.me:3000/oauth/callbackでも可能。ただし、Rails側ともURLを揃える必要がある)
Do not add query strings to your callback URLs in your Twitter app’s configuration
Don’t use localhost as a callback URL
Callback URLs — Twitter Developers<br />
上のCallback URLではクエリ文字列が使えないので、Sorceryの設定のcallback_urlでクエリを渡します。
すると、認証画面のURLにoauth_callbackというクエリが渡され、クエリを持ったコールバックURLを設定されていることがわかります。
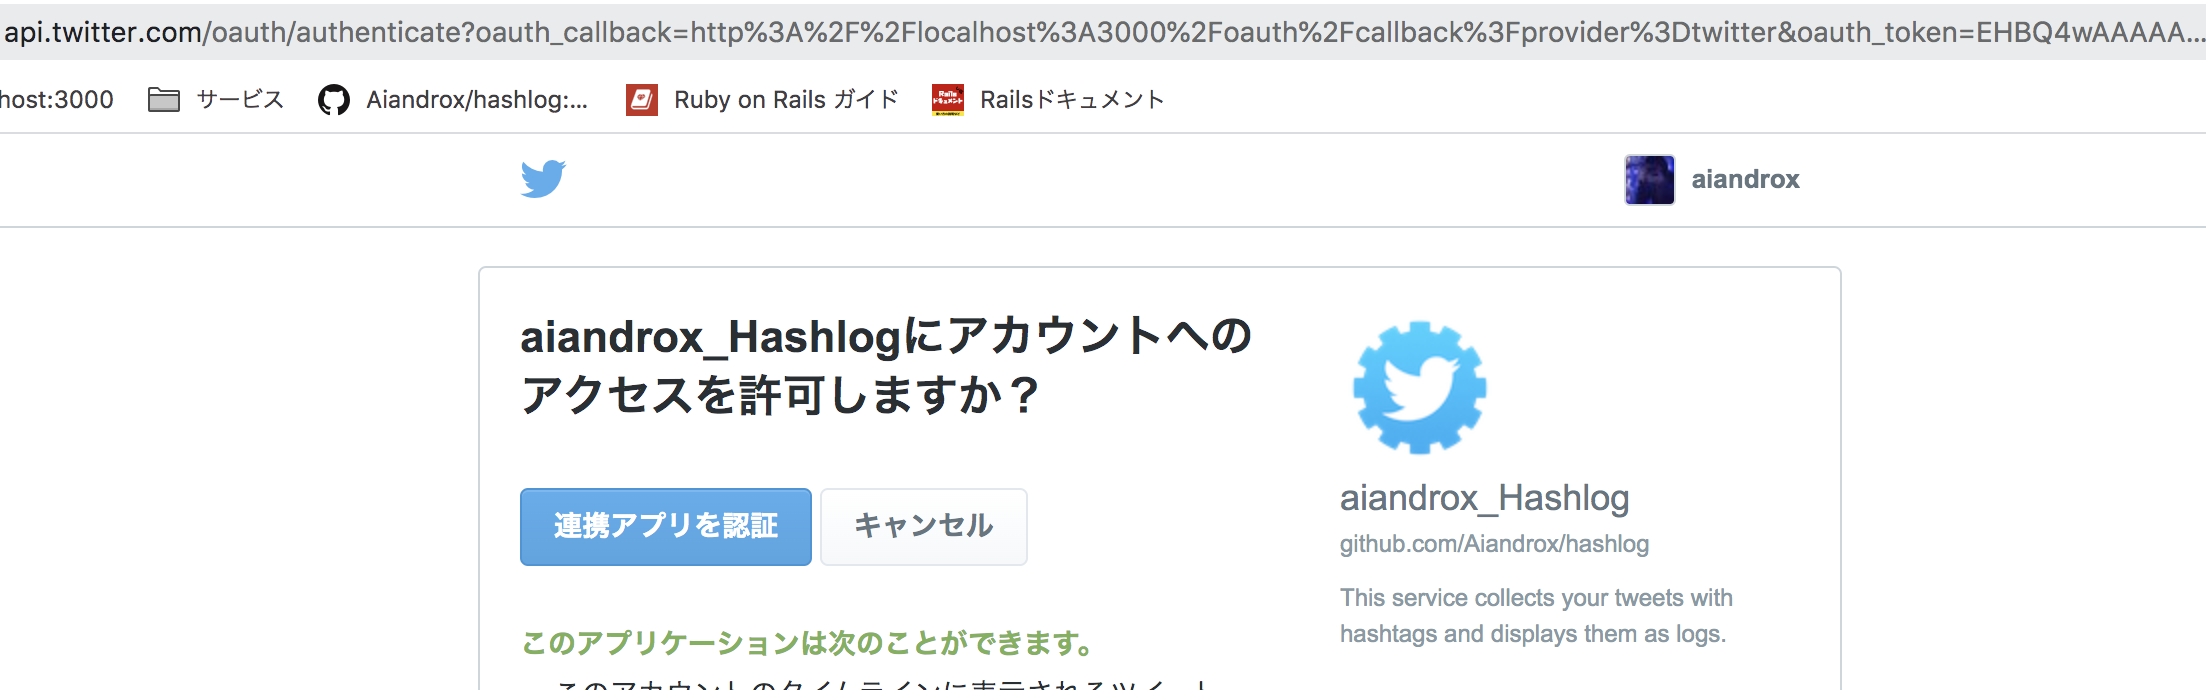
認証画面の URL
※注意
ローカルでアクセスする際はlocalhost:3000ではなく127.0.0.1:3000にアクセスするようにしてください。
参考:Twitterログイン 401 Authorization Required
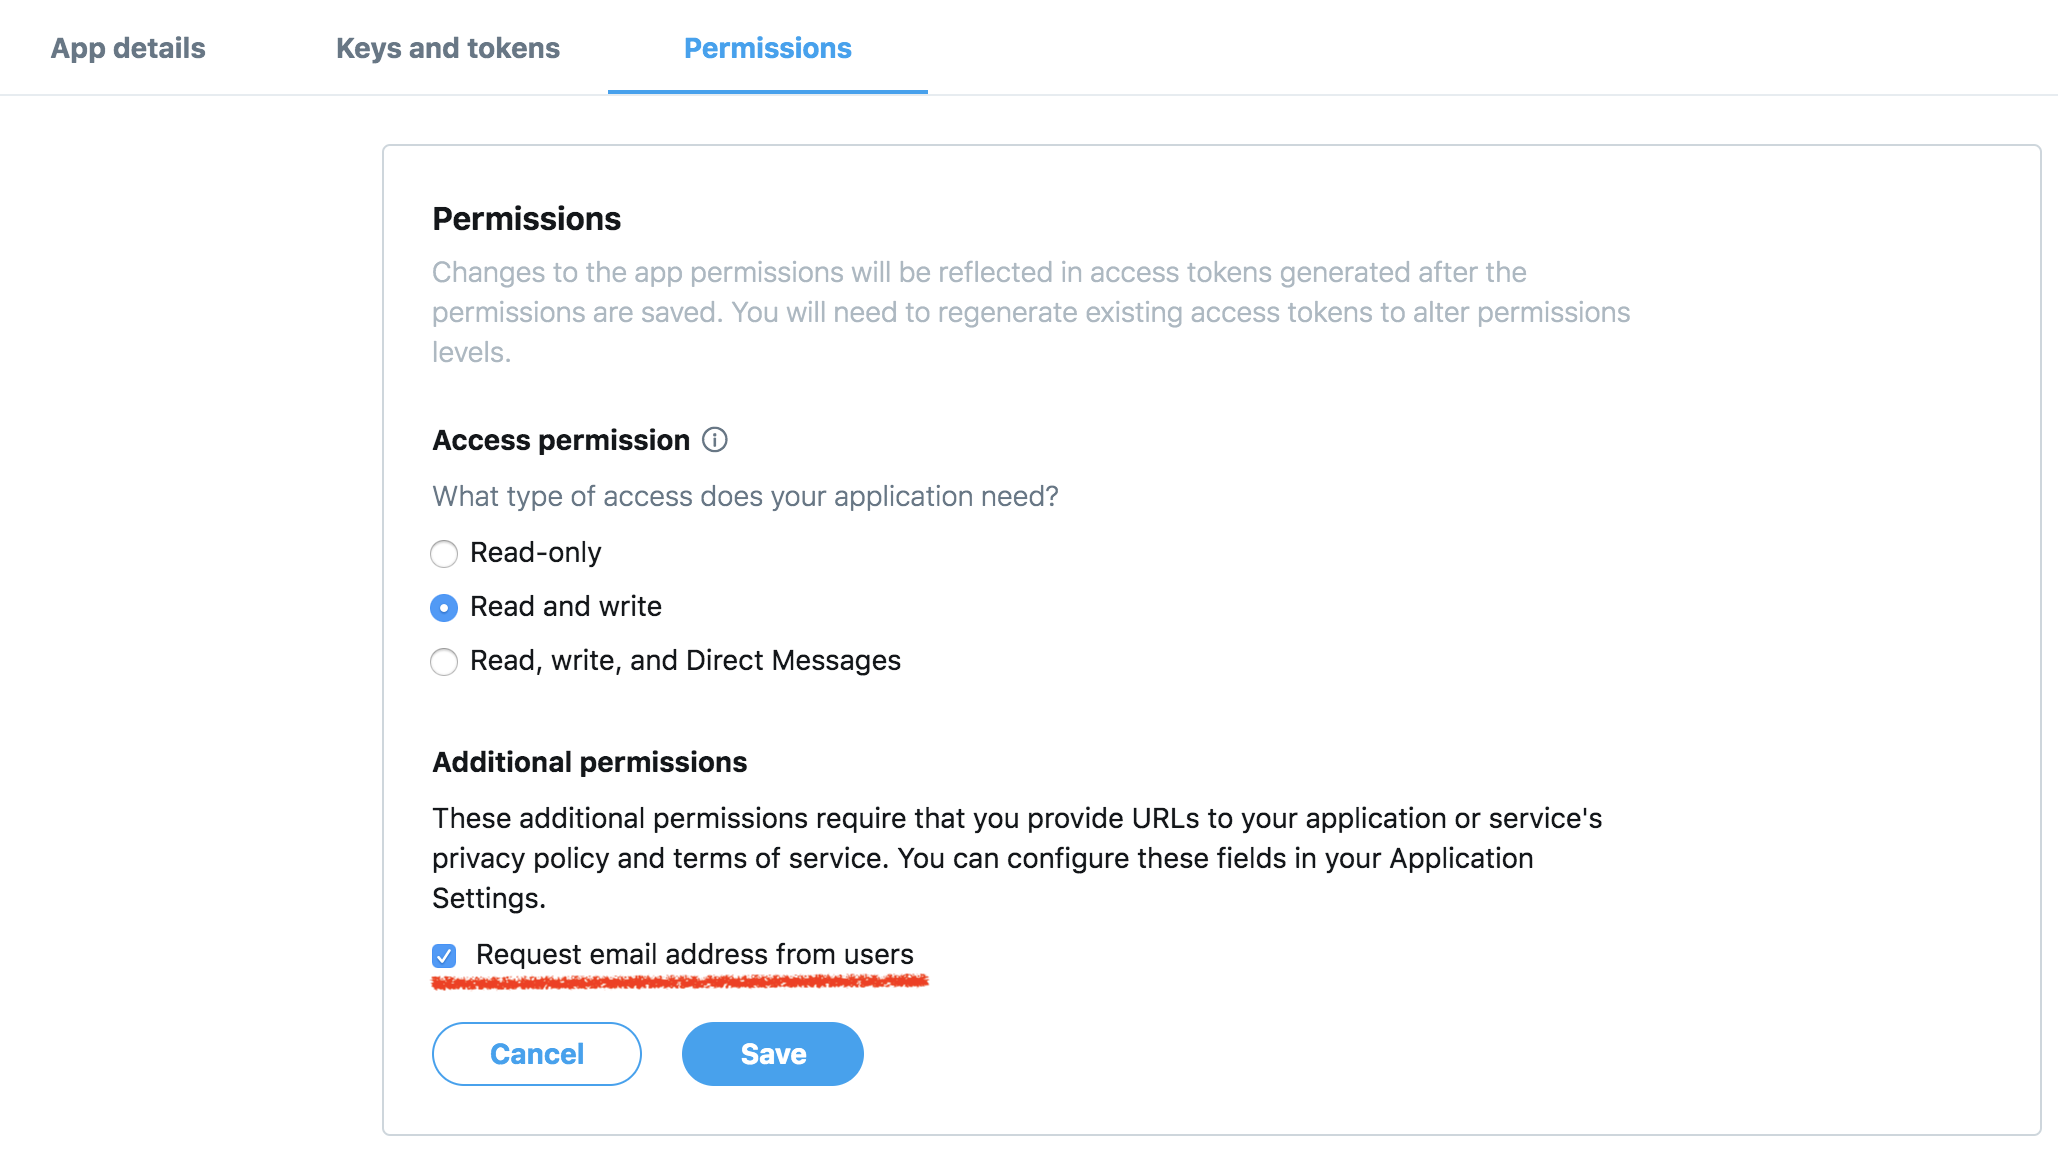
メールアドレスを取得する場合
メールアドレスを取得する場合、プライバシーポリシーと利用規約のページを登録してパーミッションをする必要があります。
URLはApp detailsのページで登録してください。ローカルのURLは登録できないので、開発中は暫定的にGitHubのリポジトリのURLを入れるといいです。
そして、以下のAdditional Permissionsのチェックを入れたらTwitter Developerの作業は終わりです。
sorcery.rbには以下の二行を追加します。
user_info_pathはデフォルトでは'/1.1/account/verify_credentials.json'になるので、クエリの入った値を代入します。また、'email'にデータが格納されるので、user.emailに保存します。
1
2
3
4
5
6
7
8
9
|
  config.twitter.key = Rails.application.credentials.dig(:twitter, :key)
  config.twitter.secret = Rails.application.credentials.dig(:twitter, :secret_key)
  config.twitter.callback_url = 'http://127.0.0.1:3000/oauth/callback?provider=twitter'
  config.twitter.user_info_path = "/1.1/account/verify_credentials.json?include_email=true" # 追加する
  config.twitter.user_info_mapping = {
    email: 'email', # 追加する
    name: 'name',
    description: 'description'
  }
|
※注意
Twitterではすべてのユーザーがメールアドレスを登録しているわけではありません。そのため、user.emailにはnilが入ることも想定して実装してください。
また、これを行った後、もしかしたらAccess tokenとAccess token secret周辺でエラーが起きるかもしれません。
(原因がこれかはわからないが、APIのエラーが出た。再度Access tokenを発行すれば問題ない)
参考:Sorceryを使ったTwitterログイン
GET account / verify_credentials — Twitter Developers
Oauth処理を行うコントローラを作成
1
|
$ rails g controller Oauths oauth callback
|
 1
 2
 3
 4
 5
 6
 7
 8
 9
10
11
12
13
14
15
16
17
18
19
20
21
22
23
24
25
26
27
28
29
|
class OauthsController < ApplicationController
  skip_before_action :require_login # applications_controllerでbefore_action :require_loginを設定している場合

  def oauth
    login_at(auth_params[:provider])
  end

  def callback
    provider = auth_params[:provider]
    if (@user = login_from(provider))
      redirect_to root_path, notice: "#{provider.titleize}でログインしました"
    else
      begin
        @user = create_from(provider)
        reset_session
        auto_login(@user)
        redirect_to root_path, notice: "#{provider.titleize}でログインしました"
      rescue StandardError
        redirect_to root_path, alert: "#{provider.titleize}でのログインに失敗しました"
      end
    end
  end

  private

  def auth_params
    params.permit(:code, :provider)
  end
end
|
基本的にはチュートリアルの通りです。多少、Rails5の書き方に直します。
補足
個人的に、StandardErrorをすべてキャッチするのはどうなのかと思うので、rescueは外しておきたいです。
1
2
3
4
5
6
7
|
    # 省略
    else
      @user = create_from(provider)
      reset_session
      auto_login(@user)
      redirect_to root_path, notice: "#{provider.titleize}でログインしました"
    end
|
ルーティングの追加
1
2
3
|
post "oauth/callback", to: "oauths#callback"
get "oauth/callback", to: "oauths#callback"
get "oauth/:provider", to: "oauths#oauth", as: :auth_at_provider
|
1
2
3
|
oauth_callback POST   /oauth/callback(.:format)              oauths#callback
                GET    /oauth/callback(.:format)             oauths#callback
auth_at_provider GET    /oauth/:provider(.:format)           oauths#oauth
|
ログインボタンを追加
1
|
<%= link_to 'Login with Twitter', auth_at_provider_path(provider: :twitter) %>
|
キャンセル後のリダイレクト処理
今の状態では、「連携アプリをキャンセル」を押したときにエラーが出てしまうので、それを解消します。
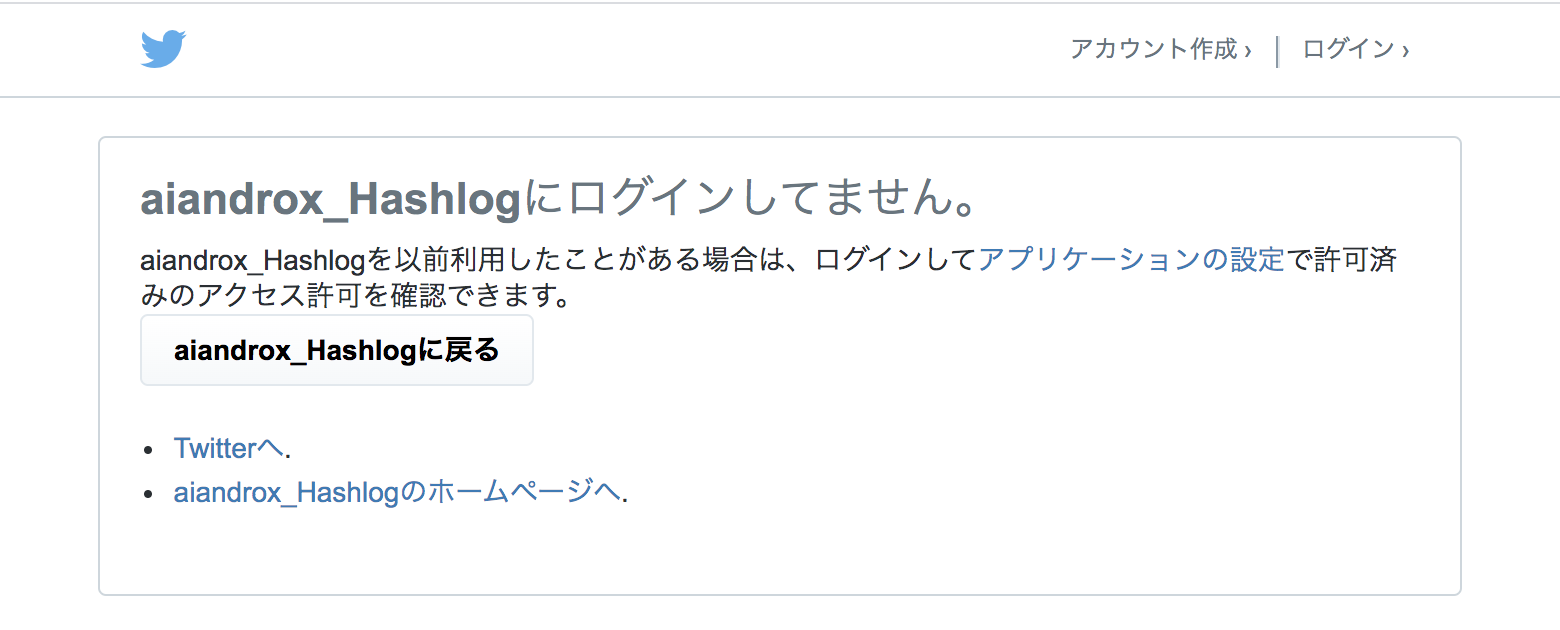
ここで「(アプリ名)に戻る」を押すと、下のように401エラーになってしまいます。
1
2
3
4
5
6
7
8
|
Started GET "/oauth/callback?provider=twitter&denied=gZtRIQAAAAABDRHmAAABcSN_g4w" for 127.0.0.1 at 2020-03-29 08:34:55 +0900
Processing by OauthsController#callback as HTML
  Parameters: {"provider"=>"twitter", "denied"=>"gZtRIQAAAAABDRHmAAABcSN_g4w"}
Unpermitted parameter: :denied
Completed 500 Internal Server Error in 400ms (ActiveRecord: 0.0ms)

OAuth::Unauthorized - 401 Authorization Required:
  app/controllers/oauths_controller.rb:12:in `callback'
|
1
|
<ActionController::Parameters {"provider"=>"twitter", "denied"=>"PsylCwAAAAABDRHmAAABcSGWp1Q", "controller"=>"oauths", "action"=>"callback"} permitted: false>
|
キャンセルした場合はparams[:denied]が存在するので、条件分岐で処理します。
 1
 2
 3
 4
 5
 6
 7
 8
 9
10
11
12
13
14
15
16
17
18
19
20
21
22
23
24
25
26
27
|
class OauthsController < ApplicationController
  def oauth
    login_at(auth_params[:provider])
  end

  def callback
    provider = auth_params[:provider]
    if auth_params[:denied].present?  # ここの節を追加
      redirect_to root_path, notice: 'ログインをキャンセルしました'
      return
    end
    if (@user = login_from(provider))
      redirect_to root_path, notice: "#{provider.titleize}でログインしました"
    else
      @user = create_from(provider)
      reset_session
      auto_login(@user)
      redirect_to root_path, notice: "#{provider.titleize}でログインしました"
    end
  end

  private

  def auth_params
    params.permit(:code, :provider, :denied)
  end
end
|
callbackメソッドが長くなり、ネストも深くなってしまったので、create_user_fromメソッドをprivate以下に切り分けます。
 1
 2
 3
 4
 5
 6
 7
 8
 9
10
11
12
13
14
15
16
17
18
19
20
21
22
23
|
class OauthsController < ApplicationController
  # (省略)

  def callback
    provider = auth_params[:provider]
    if auth_params[:denied].present?
      redirect_to root_path, notice: "#{provider.titleize}でログインしました"
      return
    end
    create_user_from(provider) unless (@user = login_from(provider))
    redirect_to root_path, notice: "#{provider.titleize}でログインしました"
  end

  private

  # (省略)

  def create_user_from(provider)
    @user = create_from(provider)
    reset_session
    auto_login(@user)
  end
end
|
以上で設定は終了です!
非公開ユーザーの情報を取得する必要がある場合、ユーザーによるツイート機能を実装する場合は以下をご覧ください。
【Rails】SorceryでTwitter認証時にaccess_tokenを取得してDBに保存する
その他参考サイト